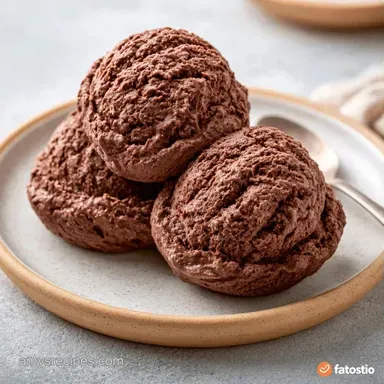
Chocolate Ice Cream with Heavy Cream

- Time:25 mins active + 6 hours chilling
- Flavor/Texture Hook: Rich, dense, and glossy
- Perfect for: Summer parties or a late night craving
The smell of melting semi sweet chocolate filling the kitchen is one of my favorite things. I remember making a batch of this for a friend's birthday a few years back, and we spent half the night just staring at how glossy the base looked before it hit the freezer.
It has that deep, dark cocoa punch that feels like a hug in a bowl.
I've always loved a thick Chocolate Ice Cream, but I hated the noise and effort of a churning machine. This version is all about simplicity. You get that heavy, decadent feel without needing any fancy gear.
We're using a combination of heavy cream and condensed milk. This creates a Creamy Heavy Cream Chocolate Ice Cream that stays smooth even after sitting in the freezer overnight. Trust me on this, it's a total win for anyone who wants a high end result with very little work.
Easy No Churn Chocolate Ice Cream
The secret lies in the balance of fat and sugar. Whipping the heavy cream creates a fat matrix that traps tiny air bubbles. Since there is no churning during the freezing process, these bubbles prevent the mixture from becoming a rock-hard mass.
Condensed Milk: The high sugar concentration lowers the freezing point, ensuring the ice cream stays scoopable. This is a frequent technique for Homemade Ice Cream recipe options that skip the custard base.
Fat Content: According to USDA FoodData, the high lipid levels in heavy whipping cream coat the tongue to provide a velvety finish. This avoids the "grainy" sensation typical of low-fat alternatives.
This Chocolate Ice Cream base remains smooth because the sugars and fats work in tandem to inhibit the formation of large ice crystals. It's basic chemistry that results in a decadent treat.
| Method | Time | Texture | Best For |
|---|---|---|---|
| No Churn | 6 hours 25 mins | Dense & Rich | Quick prep, no gear |
| Machine | 4 hours | Airy & Light | Traditional feel |
Now, let's go over the ingredients you'll need to get started.
Essential Kitchen Tools
No professional equipment is necessary, though certain tools can simplify the process. I highly suggest a metal mixing bowl, as metal retains cold better than plastic, allowing your cream to peak more quickly.
A hand mixer is ideal here. You can use a stand mixer like a KitchenAid if you prefer, but a hand mixer offers better control over the peaks. Also, keep a rubber spatula nearby for folding.
Finally, you will need an airtight container. A metal loaf pan is a great choice, as it chills the mixture more evenly than a plastic tub.
The Ingredient Breakdown
I find that a blend of cocoa powder and chocolate chips works best. The powder ensures a deep hue and a sharp "bite," while the chips provide a creamy, buttery richness. If you're confused about which cocoa to buy, King Arthur Baking has great advice on Dutch-processed versus natural varieties.
| Component | Purpose | Substitute Notes |
|---|---|---|
| Heavy Cream | Provides air and fat | Mascarpone (richer and thicker) |
| Condensed Milk | Softens and sweetens | Evaporated milk + sugar (less stable) |
| Cocoa Powder | Intense chocolate flavor | More melted chocolate (heavier) |
| Chocolate Chips | Smooth consistency | Chopped dark chocolate (more potent) |
The Grocery List
- 2 cups (480ml) heavy whipping cream, cold Why this? High fat avoids iciness
- 1 can (14 oz / 397g) sweetened condensed milk, chilled Why this? Lowers the freezing point
- 1/2 cup (45g) unsweetened cocoa powder Why this? Gives it a bold cocoa punch
- 4 oz (115g) semi sweet chocolate chips Why this? Adds body and richness
- 1 tsp (5ml) vanilla extract Why this? Enhances the chocolate notes
- 1/4 tsp (1.5g) fine sea salt Why this? Counteracts the sugar
Quick Recipe Specs
This is a slow freeze recipe, so plan your timing. The active work is quick, but the waiting is the hard part.
- Prep time: 20 minutes
- Cook time: 5 minutes
- Total time: 6 hours 25 mins
- Yield: 8 servings
For those on a budget, you can swap the brand name chocolate for store brand chips.
| Premium | Budget | Impact | Savings |
|---|---|---|---|
| Belgian Chocolate | Store brand Chips | Slightly less depth | $3 - $5 |
| Organic Cocoa | Standard Cocoa | Minimal difference | $1 - $2 |
Make sure your condensed milk is chilled before you start. It makes the mixing phase much smoother.
Bringing the Dessert Together

Time to get started. The key to success here is the temperature of the chocolate base and your cream.
Phase 1: Preparing the Chocolate Base
- Put the semi sweet chocolate in a microwave-safe bowl. Heat in 20 second intervals, stirring occasionally, until completely smooth.
- While the chocolate remains warm, stir in the salt, vanilla extract, and sifted cocoa powder. Note: Sifting the cocoa prevents lumps.
- Whisk in the chilled sweetened condensed milk until the mixture is glossy and mahogany colored.
- Allow the mixture to cool to room temperature. Note: If it's too hot, it will melt your whipped cream.
Phase 2: Whipping the Cream
- Pour the cold heavy whipping cream into a chilled mixing bowl.
- Beat on a medium-high setting until the peaks are firm. Note: The cream should stand straight up when you lift the beaters.
Phase 3: The Final Fold and Freeze
- Gently fold about one third of the whipped cream into the chocolate base using a spatula to lighten the texture.
- Carefully fold in the remaining whipped cream until no white streaks remain.
- Pour the Chocolate Ice Cream mixture into a metal loaf pan or an airtight freezer container.
- Freeze for at least 6 hours until firm and scoopable.
Fixing Texture Issues
The biggest hurdle with no churn recipes is usually the texture. If you see ice crystals, it's often because of temperature swings in the freezer.
Cream Won't Peak
This happens when the cream or the bowl is too warm. Fat molecules need to stay cold to trap air. Put your bowl and beaters in the freezer for 15 minutes before whipping.
Base is Too Thick
If the chocolate base gets too stiff, it's hard to fold in the cream without deflating the air. Gently warm the base for 5 seconds in the microwave to loosen it up.
Texture Feels Icy
This occurs if the container isn't airtight. Air gets in, and moisture freezes into crystals. Use a lid and a layer of parchment paper on the surface.
| Problem | Root Cause | Solution |
|---|---|---|
| Grainy texture | Cocoa not sifted | Sift powder before adding |
| Melted peaks | Chocolate base too hot | Cool base to room temp |
| Hard as a rock | Not enough fat/sugar | Use full fat heavy cream |
Scaling the Batch
To serve more people, feel free to double the ingredients. Just remember that whipping 4 cups of cream will require a larger bowl and a bit more time.
For a double batch, only scale the vanilla and salt by 1.5x. Using too much salt can distort the flavor, while excessive vanilla can create a medicinal taste. If you have a small mixer, I recommend making this Chocolate Ice Cream in multiple batches.
If you prefer a smaller portion, the recipe can be halved. Simply measure out half of the condensed milk (roughly 7 oz). Use a 9x5 loaf pan instead and reduce the freezing time by approximately 20%. If you like this recipe, you might also enjoy my Heavy Cream Ice Cream for a more neutral flavor profile.
Storage and Waste
Keep your Cream Chocolate Ice Cream in a sealed container tucked deep in the freezer. Avoid storing it in the door, as temperatures shift every time it's opened. It will remain fresh for up to 2 months.
For easier scooping, let the container rest on the counter for 3-5 minutes. This softens the outer edges without melting the core.
Don't discard any leftover cocoa powder or stray chocolate chips. Stir the cocoa into your morning oatmeal or use the chips as a pancake topping. Even a half-used can of condensed milk can be whisked into coffee for a rich, sweet treat.
Flavor Twist Ideas
Feel free to experiment with the flavor profile. Stir 1 tablespoon of instant espresso powder into the melted chocolate for a mocha version.
To add a salty-sweet contrast, fold in a pinch more sea salt or a handful of crushed pretzels just before finishing. For a more celebratory treat, try swirling in some caramel or adding brownie chunks.
If you're looking for another option, my Birthday Cake Ice Cream is perfect for celebrations. To give your Heavy Cream Chocolate Ice Cream some extra texture, fold in almond slivers or toasted hazelnuts.
Pairing Your Treat
This dessert is very rich, so it pairs best with something acidic or fresh. Fresh raspberries or sliced strawberries cut through the chocolate intensity perfectly.
If you're serving this for a dinner party, put a scoop of Chocolate Ice Cream on top of a warm lava cake or a slice of flourless chocolate cake. The contrast in temperatures is a winner.
You can also serve it with a drizzle of raspberry coulis or a sprinkle of orange zest. The citrus notes make the cocoa taste brighter and less heavy.
Enjoy your Chocolate Ice Cream! It's the kind of treat that makes any day feel like a special occasion.
Recipe FAQs
What role does heavy cream play in the texture?
It provides the necessary fat and air to create a smooth, fluffy consistency. Whipping the cream incorporates tiny bubbles that prevent the dessert from freezing solid.
How can I simplify the ingredient list?
Mix only the heavy cream, sweetened condensed milk, and cocoa powder. This removes the chocolate chips and salt while still delivering a sweet result.
How do I turn heavy cream into ice cream?
Whip the cold cream into stiff peaks and fold it into the chocolate base. Freeze the mixture for at least 6 hours to set.
Is it true that this recipe is heart-healthy?
No, and here's why. The high saturated fat from the cream and sugar from the condensed milk are generally restricted in heart-healthy diets.
What prevents the mixture from becoming icy?
Use chilled sweetened condensed milk and fold in the whipped cream gently. This maintains the aerated structure and prevents large ice crystals from forming.
Which method works best for an ice cream maker?
Pour the chocolate base and whipped cream into the machine and churn until thick. If you enjoyed mastering this texture, see how the same principle works in our creamy dessert.
How should I melt the chocolate chips?
Heat the semi-sweet chips in a microwave-safe bowl in 20-second bursts. Stir between each interval until the chocolate is completely smooth.
What is the best way to scoop the dessert?
Let the container sit on the counter for 3 to 5 minutes before serving. This softens the edges for a much smoother scoop.
Chocolate Ice Cream with Cocoa Powder