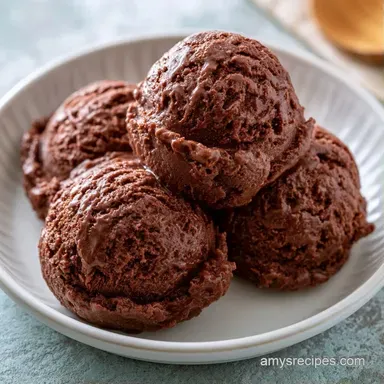
Simple Chocolate Ice Cream Maker Recipe with Cocoa Powder

- Time: 15 min active + 4 hours 20 mins chilling/churning
- Flavor/Texture Hook: Rich, dense, and creamy
- Perfect for: Weekend treats or birthday parties
Ever wonder why some chocolate ice creams taste like frozen cocoa powder and others taste like a frozen truffle? I used to think it was just the brand of cocoa, but it's actually about how the fats and sugars bind together during the churn.
I remember the first time I tried making this for a group of friends. I rushed the mixing process and ended up with tiny, bitter cocoa clumps that felt like sand in my teeth. It was a total disaster, but it taught me that the order of operations is everything when you're working with cocoa.
This Simple Chocolate Ice Cream Maker Recipe takes the guesswork out of it. We're going for a deep mahogany color and a texture that doesn't turn into a brick in the freezer.
Simple Chocolate Ice Cream Maker Recipe
The Cocoa Blend: Whisking sugar and cocoa first breaks up the clumps before the liquid hits. Fat Balance: Using both milk and heavy cream keeps the mix from being too heavy or too icy.
| Method | Churn Time | Texture | Best For |
|---|---|---|---|
| Ice Cream Maker | 20 mins | Airy and smooth | Classic dessert |
| No Churn (Whisk) | 0 mins | Denser, fudgy | Quick fixes |
| Hand Crank | 45 mins | Slightly grainier | Nostalgia |
Why These Ingredients Work
| Ingredient | What It Does | Best Swap |
|---|---|---|
| Heavy Cream | Provides the fat for creaminess | Full fat coconut milk |
| Cocoa Powder | Gives the deep chocolate base | Melted dark chocolate |
| Granulated Sugar | Lowers the freezing point | Honey (adds floral notes) |
| Whole Milk | Thins the mix for better churning | Cashew milk |
The Gear and Ingredients
For the base, you'll need a few pantry staples. I recommend using a high-quality Dutch processed cocoa powder for a smoother, less acidic taste.
- 3/4 cup (150g) granulated sugar Why this? Keeps the ice cream soft enough to scoop.
- 1/2 cup (45g) unsweetened cocoa powder Why this? Provides the core chocolate flavor.
- 1/4 tsp (1.5g) salt Why this? Cuts through the richness.
- 1 cup (240ml) whole milk, chilled Why this? Balances the heavy cream.
- 2 cups (480ml) heavy cream, chilled Why this? Creates the creamy structure.
- 2 tsp (10ml) vanilla extract Why this? Rounds out the cocoa notes.
If you're looking for something fruity, my Strawberry Ice Cream Maker recipe uses a similar base but adds fresh puree.
Tools For The Job
You don't need a professional kitchen, but a few things make this easier. A large mixing bowl is a must, and a whisk is your best friend here.
I usually use a stand mixer such as KitchenAid to get the cocoa and sugar blended, but a hand whisk works just as well if you have the arm strength. Most importantly, make sure your ice cream maker canister has been in the freezer for at least 24 hours.
If it's not frozen solid, the mix will just sit there and never thicken.
Steps From Prep to Plate

Follow these steps exactly to avoid those dreaded cocoa lumps.
- Whisk together the granulated sugar, cocoa powder, and salt in a large bowl. Note: Doing this dry prevents clumps.
- Slowly pour in the chilled whole milk.
- Whisk constantly until the mixture is smooth and no dry cocoa remains.
- Stir in the heavy cream and vanilla extract.
- Mix until the liquid is a uniform, deep mahogany color.
- Turn on your ice cream maker and pour the base into the frozen canister.
- Churn on medium high speed for 20 minutes until it reaches a soft serve consistency.
- Transfer the ice cream into an airtight freezer safe container.
- Smooth the top with a spatula and press parchment paper directly onto the surface.
- Freeze for 4 hours until the ice cream is firm.
Chef's Note: If you want a deeper flavor, add a teaspoon of instant espresso powder to the dry ingredients. It doesn't make it taste like coffee, it just makes the chocolate taste "more" like chocolate.
Tips and Common Pitfalls
One thing that trips people up is the "icy" texture. This usually happens if the base is too warm when it hits the canister. Keep your milk and cream in the fridge until the very second you need them.
Why Your Ice Cream Is Grainy
Graininess usually comes from sugar that didn't dissolve or cocoa that clumped. According to King Arthur Baking, ensuring your sugars are fully integrated into the fats prevents crystallization.
Why the Mix Overflowed
If you overfill your machine, the air bubbles will push the mix over the edge. Leave at least two inches of space at the top of the canister to allow for "overrun," which is the air whipped into the cream.
| Problem | Root Cause | Solution |
|---|---|---|
| Icy crystals | Base was too warm | Chill the mix 2 hours before churning |
| Too soft to scoop | Not enough sugar | Ensure 3/4 cup sugar is used |
| Bitter taste | Low quality cocoa | Switch to Dutch processed cocoa |
Fun Flavor Twists
Once you've got this Simple Chocolate Ice Cream Maker Recipe down, you can start adding mix ins. The trick is to add them in the last 2 minutes of churning.
- The Nutty Crunch: Add 1/2 cup of toasted hazelnuts.
- The Fudge Swirl: Fold in ribbons of salted caramel after churning.
- The Minty Fresh: Swap the vanilla for 1/2 tsp of peppermint extract.
If you want a different vibe entirely, try a Quick Ice Cream Maker Dessert for something faster.
For those who want a "Condensed Milk version," you can swap the sugar and milk for one can of sweetened condensed milk. This results in a denser, more fudge like consistency. If you prefer dark chocolate, increase the cocoa powder by 2 tablespoons and reduce the sugar by 1 tablespoon.
Storage and Zero Waste
Keep your ice cream in a shallow, airtight container. This helps it freeze evenly and reduces the surface area exposed to air.
Storage Guidelines Store in the back of the freezer where the temp is most stable. It stays fresh for about 2 weeks. After that, it starts to develop that "freezer taste."
Zero Waste Tips If you have leftover heavy cream, don't toss it. You can whip it for a topping or simmer it with sugar to make a quick dulce de leche. If you have a bit of chocolate base left in the machine, freeze it in an ice cube tray to make "chocolate cream cubes" for iced coffee.
Plating Styles
How you serve this depends on who you're feeding. I like to switch it up based on the occasion.
- Simple: A big scoop in a chilled ceramic bowl.
- Polished: A glass goblet with a few fresh raspberries and a mint leaf.
- Restaurant: A neat quenelle (oval scoop) on a plate, topped with a pinch of flaky sea salt and shaved dark chocolate.
| Plating Level | Vessel | Garnish | Vibe |
|---|---|---|---|
| Simple | Bowl | None | Cozy |
| Polished | Goblet | Berries | Date Night |
| Restaurant | Plate | Sea Salt | Fancy |
Best Pairing Ideas
The Classic Contrast
Pair this with a warm, gooey chocolate brownie. The heat from the brownie melts the ice cream slightly, creating a rich sauce that coats everything.
The Fresh Balance
Serve this alongside sliced tart cherries or a fresh raspberry coulis. The acidity of the fruit cuts through the heavy cream, making the whole dessert feel lighter.
Right then, you've got everything you need. Just remember: don't rush the whisking, keep your cream cold, and give it those full 4 hours in the freezer. Trust me on this, the wait is worth the scoop.
Recipe FAQs
How to make chocolate ice cream with an ice cream maker?
Pour the mixed chocolate base into a frozen canister and churn on medium-high speed for 20 minutes. Stop once the mixture reaches a soft-serve consistency and holds a soft peak.
How to make homemade chocolate ice cream creamy and not icy?
Keep your milk and heavy cream chilled in the fridge until the moment of use. Cold ingredients prevent the base from warming up, which stops large ice crystals from forming during the churning process.
How to make quick homemade chocolate ice cream?
Whisk sugar, cocoa, and salt, then stir in chilled milk, cream, and vanilla. Churn the mixture for 20 minutes and freeze for at least 4 hours to reach a scoopable consistency.
Is it true that I can make this specific recipe with only two ingredients?
No, this is a common misconception. This recipe requires six specific ingredients, sugar, cocoa powder, salt, milk, heavy cream, and vanilla, to achieve the proper mahogany color and creamy texture.
How to prevent cocoa powder clumps in the base?
Whisk the granulated sugar, cocoa powder, and salt together while dry. This ensures the cocoa is evenly distributed before you slowly pour in the chilled milk.
How to store homemade chocolate ice cream to keep it fresh?
Transfer the ice cream to a shallow, airtight freezer-safe container. Press parchment paper directly onto the surface to prevent freezer burn and store it in the back of the freezer for up to 2 weeks.
Can I use this same churning method for other flavors?
Yes, the churning process is identical for most cream-based recipes. If you enjoyed mastering the churn here, see how the same principle works in our vanilla ice cream.
Chocolate Ice Cream Maker Recipe: Creamy