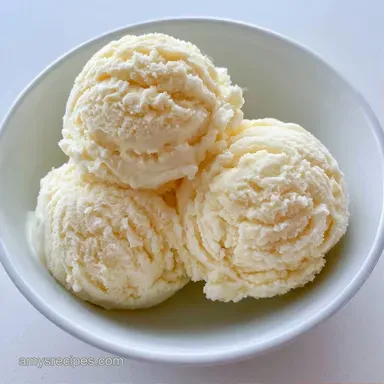
Quick Ice Cream Maker Dessert: Creamy Vanilla

- Time: 5 min active + 4 hrs 20 mins chilling/churning
- Flavor/Texture Hook: Rich, creamy, and dense vanilla
- Perfect for: Last minute cravings or a simple family treat
The smell of vanilla bean and the rhythmic whir of a churning machine always take me back to those old-fashioned neighborhood socials. In many cultures, ice cream represents a shared moment of luxury, whether it's the street vendors in Italy or the family gatherings in the American South.
It's more than just frozen sugar; it's a tradition of cooling down together.
I used to think making ice cream required a chemistry degree and a stovetop custard. I spent far too long whisking egg yolks over double boilers only to have them scramble. This version changes that by using a shortcut that still tastes like the real deal.
You can expect a dense, rich treat that doesn't feel like it came from a carton. This Quick Ice Cream Maker Dessert relies on a few high fat ingredients to get that professional mouthfeel without the hours of labor.
Quick Ice Cream Maker Dessert
The Trick with Condensed MilkSugar Stability: Condensed milk has less water than regular milk, which stops large ice crystals from forming. Fat Content: The heavy cream and half and half create a stable emulsion that feels rich on the tongue.
According to Serious Eats, controlling the ice crystal size is the only way to get a professional texture. By reducing the water content in the base, this recipe ensures the result stays smooth.
| Method | Time | Texture | Best For |
|---|---|---|---|
| Condensed Milk | 5 min prep | Dense & Smooth | Quick cravings |
| Custard Base | 45 min prep | Airy & Complex | Formal dinner parties |
Ingredient Deep Dive
| Ingredient | What It Does | Best Swap |
|---|---|---|
| Condensed Milk | Sweetens and prevents iciness | Evaporated milk + sugar |
| Heavy Cream | Provides the fat for richness | Full fat coconut cream |
| Half and Half | Balances the thickness | Whole milk |
| Vanilla Extract | Primary aromatic flavor | Vanilla bean paste |
Everything You'll Need
- 1 cup heavy whipping cream, chilled Why this? Essential for the air bubbles during churning
- 1/2 cup half and half Why this? Thins the condensed milk for a better pour
- 1/2 cup lightened sweetened condensed milk Why this? Provides sweetness and a silky texture
- 1 tbsp pure vanilla extract Why this? Deep, classic floral notes
- 1/4 tsp fine sea salt Why this? Cuts through the sugar
- 1 tbsp powdered sugar Why this? Dissolves instantly without graininess
Substitutions
| Original Ingredient | Substitute | Why It Works |
|---|---|---|
| Heavy Cream | Coconut Cream | Same fat content. Note: Adds coconut flavor |
| Half and Half | Whole Milk | Works well, but the result is slightly less rich |
| Vanilla Extract | Almond Extract | Provides a nutty, cherry like flavor profile |
Churning Your Ice Cream
Chef's Note: Freeze your canister for at least 24 hours. If you hear any liquid sloshing inside before you start, it's not cold enough and your ice cream won't set.
- Pour the lightened condensed milk, half and half, vanilla extract, and salt into a chilled mixing bowl.
- Whisk the mixture vigorously for 60 seconds until the salt has completely dissolved.
- Stir in the heavy cream slowly. Note: Do not whisk here, as you don't want to create peaks.
- Pour the liquid into your frozen canister.
- Turn on the machine and churn for 15-20 minutes.
- Watch for the moment the mixture thickens until it pulls away from the sides of the bowl.
- For a soft serve style, scoop it out immediately.
- For a traditional scoop, transfer the mixture to a freezer safe container.
- Freeze for 2 hours until firm and scoopable.
Fixing Common Texture Issues

When you're making a Quick Ice Cream Maker Dessert, the temperature is everything. If your freezer isn't cold enough or your ingredients are room temperature, the fat won't bond correctly.
Icy Crystals Forming
This usually happens if there is too much water in the mix or if the freezer is fluctuating in temperature. Ensure your cream is chilled and don't add extra water based extracts.
Mixture Too Thick
If the machine struggles to turn, you might have over churned. Stop the machine immediately to avoid damaging the motor or churning the butter.
Butter Pockets
Over churning the cream can cause the fat to separate. This creates tiny bits of butter in your dessert.
| Problem | Root Cause | Solution |
|---|---|---|
| Grainy Texture | Undissolved sugar | Whisk condensed milk for full 60 seconds |
| No Freeze | Canister not cold enough | Freeze canister for 24 hours |
| Too Airy | Over beating cream | Stir cream in gently, don't whisk |
Adjusting the Batch Size
Scaling Down (Half Batch) Use a smaller canister if possible. If using a standard machine, reduce the churn time by about 20% because there is less mass to freeze. Since you can't easily split an egg here (thankfully), just halve the liquids.
Scaling Up (Double Batch) Don't fill your canister more than 3/4 full. The mixture needs room to expand as air is incorporated. Work in two separate batches to ensure the motor doesn't overheat.
Decision Shortcut
- If you want a soft, swirlable treat: Stop at 15 minutes of churning.
- If you want a hard scoop: Freeze for a full 2 hours after churning.
- If you want a richer flavor: Increase the vanilla extract to 1.5 tbsp.
Busting Ice Cream Myths
Myth: You need eggs for a creamy texture. Not true. While custard bases are great, condensed milk provides enough solids and sugar to prevent ice crystals, creating a similarly smooth result.
Myth: Salt ruins the sweetness. Actually, a pinch of salt suppresses bitterness and enhances the perception of sweetness. It makes the vanilla taste "brighter."
Storage and Leftover Tips
Store your ice cream in an airtight container. Press a piece of parchment paper or plastic wrap directly onto the surface of the ice cream before sealing the lid. This prevents freezer burn from forming on top. It stays fresh for about 2 weeks in the freezer.
If you have leftover condensed milk, don't toss it. Mix it into your morning coffee for a creamy, sweetened treat or stir it into oatmeal. If you're looking for more ways to use your machine, try my simple vanilla ice cream maker approach for a lighter version.
Sweet Pairing Ideas
To make this dessert look professional, focus on color contrast. Since the base is white, use deep colors to make the plate pop.
- 1. Deep Red
- Add a swirl of raspberry coulis or a few fresh raspberries for a tart contrast.
- 2. Dark Brown
- Shave some 70% dark chocolate over the top right before serving.
- 3. Bright Green
- A sprig of fresh mint provides a fresh aroma and a vivid color accent.
This Quick Ice Cream Maker Dessert pairs well with a warm brownie or a slice of toasted pound cake. If you want something even more decadent, you can check out my creamy homemade ice cream tips for adding mix ins like cookie dough or fudge swirls. Just remember to add your chunks in the last 2 minutes of churning so they don't get pulverized.
Recipe FAQs
How to make homemade ice cream creamy and not icy?
Whisk the base vigorously for 60 seconds. This ensures the salt and lightened sweetened condensed milk are completely dissolved, which prevents ice crystals from forming.
What is the simplest recipe for a quick ice cream?
Combine condensed milk, half-and-half, cream, vanilla, salt, and powdered sugar. If you enjoyed mastering the texture here, see how the same fat ratio logic applies to our birthday ice cream.
How to make ice cream using an ice cream maker?
Pour the mixture into a frozen canister and churn for 15-20 minutes. Stop the machine once the mixture thickens and begins to pull away from the sides of the bowl.
How to make simple ice cream without a cooked custard?
Mix chilled liquid ingredients together before churning. Simply stir in the heavy whipping cream and churn to achieve a smooth consistency without the need for heating.
How to get a scoopable texture instead of soft-serve?
Freeze the churned mixture for an additional 2 hours. Transfer the ice cream to a freezer-safe container first to ensure it firms up for traditional scooping.
Is it necessary to whip the heavy cream before adding it?
No, this is a common misconception. Stir the cream in as a liquid to maintain a uniform consistency; over-beating it into peaks before churning can ruin the texture.
How to prevent freezer burn when storing homemade ice cream?
Press parchment paper or plastic wrap directly onto the surface. Seal with an airtight lid to block air from contacting the ice cream during its two-week shelf life.
Quick Ice Cream Maker Dessert: Creamy