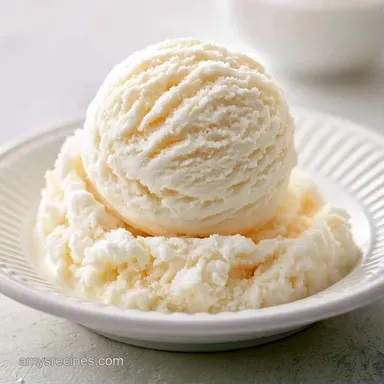
Silky Smooth Vanilla Ice Cream

- Time: 5 min active + 2 hours 20 mins chilling/churning
- Flavor/Texture Hook: Rich, creamy, and matte finish
- Perfect for: Summer parties or a quick weekend treat
The smell of pure vanilla extract hitting cold cream always reminds me of the ice cream shop three blocks from my childhood home. I remember trying to recreate that specific taste for years, often overcomplicating things by cooking a custard that tasted more like pudding than frozen dessert.
I eventually learned that you don't need a stove to get a high end result. By using chilled ingredients and a proper churn, you get a clean, crisp flavor that doesn't get muffled by cooked eggs.
This Easy Homemade Ice Cream Maker Dessert is for those who want the reward without the tedious tempering of yolks. It's a straightforward process that produces a thick, scoopable treat.
Easy Homemade Ice Cream Maker Dessert
Cold Temperature: Keeping the base chilled prevents the fat from melting, which keeps the air bubbles small. Sugar Balance: Sugar lowers the freezing point of the water in the milk, so it doesn't turn into a solid block of ice, as noted by Serious Eats.
| Method | Time | Texture | Best For |
|---|---|---|---|
| Churned | 2 hours 25 mins | Airy and smooth | Classic scoops |
| No Churn | 6 hours | Denser and richer | Quick prep |
| Hand Crank | 45 mins | Icy/Grainy | Nostalgia |
Avoiding Common Churning Mistakes
Many people make the mistake of adding their mix ins too early. If you throw in chocolate chips at the start, they often sink to the bottom or get pulverized by the paddle.
Another issue is the "over churn." If you let the machine run too long, the friction actually starts to warm the ice cream back up. You want to stop right when it looks like thick soft serve.
Recipe Specs
The goal here is a balanced base that freezes evenly. Since we aren't using stabilizers, the quality of your cream really matters.
Decision Shortcut: If you want it richer, use double cream. If you want it softer, add an extra tablespoon of sugar. If you want it denser, churn for 5 minutes less.
Essential Ingredient List
| Ingredient | What It Does | Best Swap |
|---|---|---|
| Heavy Cream | Provides the fat for a creamy mouthfeel | Mascarpone (for richness) |
| Whole Milk | Balances the fat so it isn't too heavy | Half and half |
| Granulated Sugar | Sweetens and prevents hard freezing | Honey (adds floral notes) |
| Vanilla Extract | The primary flavor profile | Vanilla bean paste |
| Sea Salt | Cuts the sweetness and boosts flavor | Kosher salt |
Ingredients: 2 cups heavy cream, chilled Why this? High fat content prevents iciness 1 cup whole milk, chilled Why this? Adds fluidity to the base ¾ cup granulated sugar Why this? Essential for the freezing point 1 tbsp pure vanilla extract Why this? Provides a clean, aromatic scent ¼ tsp sea salt Why this? Balances the sugar
Needed Kitchen Tools

You'll need a standard electric ice cream maker. Make sure the canister has been in the freezer for at least 24 hours, or you'll just have cold soup.
A large mixing bowl and a sturdy whisk are a must. If you have a handheld mixer, that works too, but a whisk gives you more control over the sugar dissolution.
The Churning Process
- Combine the chilled heavy cream, whole milk, and sugar in a large mixing bowl.
- Whisk vigorously for 2-3 minutes until the sugar has completely dissolved and the liquid is uniform. Note: Grainy sugar leads to a gritty texture.
- Stir in the vanilla extract and sea salt until fully integrated.
- Pour the mixture into a pre frozen ice cream maker canister.
- Churn according to the manufacturer's directions, typically for 15-25 minutes, until the ice cream reaches a thick, soft serve consistency with a matte finish.
- Transfer the soft ice cream into an airtight freezer safe container.
- Press a piece of parchment paper directly onto the surface of the ice cream to prevent ice crystals from forming.
- Freeze for at least 2 hours until firm and scoopable.
Chef Note: For a more velvety feel, chill your mixing bowl in the freezer for 10 minutes before whisking the base.
Fixing Texture Issues
If your ice cream comes out too icy, it's usually because the base was too warm when it hit the canister. This happens often in hot kitchens. Trust me on this, keeping everything chilled is the only way to ensure a smooth result.
If you struggle with consistency, you might want to look at my creamy ice cream maker recipe for more advanced base tips.
Why Your Ice Cream Is Grainy
This usually happens when the sugar doesn't dissolve fully or the churning time was too short. The sugar crystals remain intact, creating a sandy feel on the tongue.
Why Your Ice Cream Is Too Hard
Too much milk or not enough sugar can cause the dessert to freeze like a brick. You can fix this by letting it sit on the counter for 5 minutes before scooping.
| Problem | Root Cause | Solution |
|---|---|---|
| Icy crystals | Warm base / Air exposure | Use parchment paper cover |
| Butteriness | Over churning | Stop at soft serve stage |
| Bland taste | Not enough salt | Add a pinch more salt next time |
Tasty Flavor Twists
This base is a blank canvas. You can easily turn this into a party favorite by folding in extras during the last 2 minutes of churning.
For a celebration, try adding cake chunks and sprinkles to mimic my Cream in 15 Minutes recipe. It's a huge hit with kids.
- Chocolate Twist
- Fold in 1/2 cup of mini chocolate chips.
- Fruit Swirl
- Swirl in raspberry jam after churning but before freezing.
- Nutty Crunch
- Add toasted almonds or crushed walnuts.
Storage and Prep Tips
Store your ice cream in the back of the freezer, away from the door. The temperature fluctuations near the door cause the edges to melt and refreeze, creating those annoying ice crystals. It stays fresh for about 2 weeks.
To avoid waste, if you have leftover cream that isn't quite enough for a full batch, freeze it in ice cube trays. You can pop those frozen cream cubes into a smoothie or a coffee for a rich treat.
Serving Your Treat
For the best experience, use a warmed scoop. Run your metal scoop under hot water for a few seconds. It will glide through the ice cream and create those beautiful, round spheres.
Serve in chilled bowls to keep the dessert from melting too fast. A simple garnish of fresh berries or a sprig of mint makes it feel like something from a professional shop. This Easy Homemade Ice Cream Maker Dessert is best enjoyed immediately after the final freeze.
Recipe FAQs
How to make homemade ice cream creamy and not icy?
Press parchment paper directly onto the surface. This creates a physical barrier that prevents air contact and stops ice crystals from forming during the final freeze.
What is the simplest recipe for ice cream?
Whisk together heavy cream, whole milk, sugar, vanilla, and sea salt. This five-ingredient method requires no cooking or eggs to achieve a professional texture.
How to make ice cream using an ice cream maker?
Pour the chilled mixture into a pre-frozen canister. Churn for 15-25 minutes until it reaches a thick, matte consistency, then freeze for at least 2 hours.
How to prepare a simple ice cream base?
Combine chilled heavy cream, whole milk, and sugar. Whisk vigorously for 2-3 minutes to ensure the sugar is fully dissolved before stirring in the vanilla and sea salt.
Is it true that ice cream must be cooked on a stove to be creamy?
No, this is a common misconception. A chilled, whisked base churned in a machine achieves a smooth, velvety texture without any heat application.
Is chilled heavy cream required for this recipe?
Yes, use heavy cream that is thoroughly chilled. Cold fats emulsify more effectively and freeze faster, which results in a significantly smoother mouthfeel.
Where is the best place to store homemade ice cream?
Store the container in the back of the freezer. This avoids the temperature swings caused by opening the door, which prevent the edges from melting and refreezing. If you enjoyed mastering the temperature control for this dessert, see how the same precision works in our birthday layer cake.
Easy Ice Cream Maker Dessert: Creamy