Classic Birthday Layer Cake: Velvety and Decadent

- Time: 35 min active + 2 hours chilling
- Flavor/Texture Hook: Velvety vanilla sponge with a glossy chocolate finish
- Perfect for: Milestone birthdays or family celebrations
- Classic Birthday Layer Cake
- Why This Recipe Actually Works
- Cake Component Deep Dive
- The Essential Baking Gear
- Ingredients & Substitutes
- Step by Step Baking Guide
- Fixing Common Cake Fails
- Troubleshooting Common Issues
- Adjusting Your Batch Size
- Debunking Cake Myths
- Storage and Waste Tips
- The Best Pairing Ideas
- Recipe FAQs
- 📝 Recipe Card
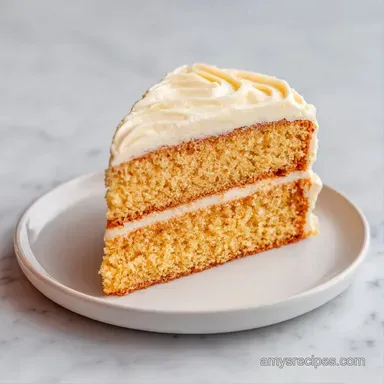
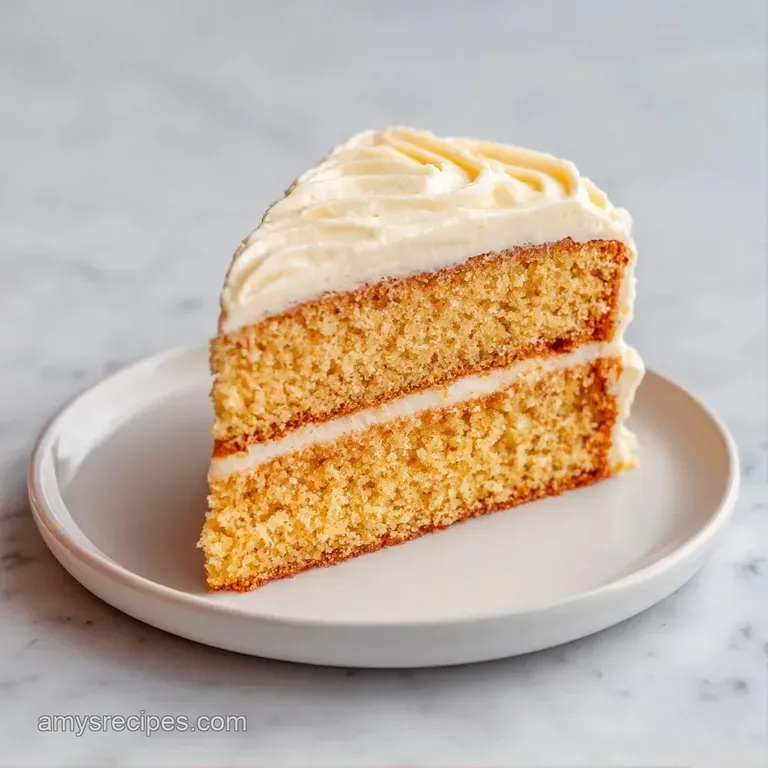
Classic Birthday Layer Cake
The smell of vanilla bean and melting butter hitting a hot pan always takes me back to my grandma's kitchen. There is something about that specific aroma that just feels like a celebration. For this recipe, the real hero is the cake flour.
I used to think all purpose flour was fine, but then I realized why my cakes felt "bready" instead of "cloud like." Cake flour has less protein, which means less gluten develops when you mix it, giving you that melt in-your mouth texture.
This Classic Birthday Layer Cake isn't about being fancy or using a dozen weird ingredients. It's about the basics done right. We're talking about a sponge that doesn't dry out and a frosting that actually holds its shape without tasting like pure sugar. It's a foolproof way to show some love to your favorite people.
You can expect a cake that is sturdy enough to stack three layers high but light enough that you won't feel like you need a nap immediately after one slice. It's the kind of dessert that looks like it took a whole day of work, but most of the time is just the cake chilling in the fridge.
Why This Recipe Actually Works
Low Protein Structure: Using cake flour instead of all purpose prevents the cake from becoming too chewy, ensuring a velvety crumb.
Air Incorporation: Beating butter and sugar for a full 5 minutes creates tiny air pockets that expand in the oven, lifting the cake.
Temperature Balance: Room temperature eggs and milk blend into the fat without curdling, creating a smooth, stable emulsion.
Fat Stabilization: The high butter content in the frosting provides a structural anchor, which keeps the layers from sliding.
Controlled Hydration: Alternating dry and wet ingredients prevents the batter from breaking and keeps the air bubbles intact.
| Method | Prep Time | Texture | Best For |
|---|---|---|---|
| Traditional Oven | 35 minutes | Even rise, golden crust | Large parties, classic look |
| Slow Cooker | 35 minutes | Denser, steamed feel | Small batches, no oven homes |
Cake Component Deep Dive
| Ingredient | Science Role | Pro Secret |
|---|---|---|
| Cake Flour | Lowers gluten formation | Sift it twice to avoid clumps |
| Unsalted Butter | Provides structure and fat | Soften to 65°F for better aeration |
| Baking Powder | Chemical leavening | Use aluminum free to avoid metallic taste |
| Whole Milk | Hydrates flour proteins | Always use room temperature |
The Essential Baking Gear
For a Classic Birthday Layer Cake, you don't need a professional studio, but a few specific tools make life easier. A stand mixer such as KitchenAid is great for the frosting, but a hand mixer works just as well if you have a strong wrist.
You'll need three 8 inch round cake pans. I highly recommend using parchment paper circles at the bottom. I once spent twenty minutes trying to wiggle a cake out of a pan only for the bottom to stay behind. It was a disaster. Now, I always line them.
A wire cooling rack is non negotiable. If you leave the cakes in the pan too long, they steam and get soggy. If you put them on a flat counter, the bottom gets wet. The rack lets air circulate, keeping the edges clean.
Ingredients & Substitutes
For the Sponge:
- 1 cup (225g) unsalted butter, softenedWhy this? Essential for the creamy, rich base
- 1 ½ cups (300g) granulated sugarWhy this? Provides sweetness and helps aeration
- 3 large eggs, room temperatureWhy this? Binds the cake and adds lift
- 1 tbsp (15ml) pure vanilla extractWhy this? Deep, floral aroma
- 2 ½ cups (310g) cake flour (sifted)Why this? Keeps the crumb tender and soft
- 2 tsp (10g) baking powderWhy this? Ensures a high, fluffy rise
- ½ tsp (3g) saltWhy this? Balances the sweetness
- 1 cup (240ml) whole milk, room temperatureWhy this? Adds moisture and richness
For the Frosting:
- 1 cup (225g) unsalted butter, softenedWhy this? Base for a stable frosting
- ¾ cup (75g) unsweetened cocoa powderWhy this? Intense chocolate flavor
- 3 cups (360g) powdered sugarWhy this? Creates a smooth, pipeable texture
- 3 tbsp (45ml) heavy creamWhy this? Adjusts consistency and adds creaminess
- 1 tsp (5ml) pure vanilla extractWhy this? Rounds out the chocolate notes
| Original Ingredient | Substitute | Why It Works |
|---|---|---|
| Cake Flour | AP Flour + 2 tbsp Cornstarch | Mimics low protein. Note: Slightly less tender |
| Whole Milk | Buttermilk | Adds tang and tenderness. Note: Use this guide to make your own |
| Heavy Cream | Full fat Greek Yogurt | Adds thickness. Note: Frosting will be tangier and less glossy |
| Butter | Margarine | Similar fat content. Note: Flavor is less rich, texture is softer |
Step by step Baking Guide
Phase 1: Building the Batter
Beat the softened butter and granulated sugar on medium high. Mix for 3-5 minutes until the mixture looks pale and fluffy. Note: Don't rush this; this is where the air gets in.
Add eggs one at a time. Beat well after each egg to ensure it's fully combined, then stir in the vanilla extract.
Reduce mixer speed to low. Add one third of the sifted flour mixture, then half of the milk. Repeat this process, ending with the flour. Mix only until white streaks disappear. Note: Overmixing at this stage makes the cake tough.
Phase 2: The Precision Bake
Divide the batter evenly between three greased and parchment lined 8 inch round cake pans. Use a scale if you have one to ensure they are identical.
Bake at 350°F (175°C) for 30-35 minutes. Test the center with a toothpick until it comes out clean or with a few moist crumbs.
Cool cakes in the pans for 10 minutes. Transfer them to a wire cooling rack to cool completely. Note: Frosting a warm cake leads to a melted mess.
Phase 3: Whipping the Frosting
Beat the softened butter for the frosting on medium speed until smooth and creamy.
Sift in the cocoa powder and powdered sugar. Sifting is a must here, or you'll have tiny white lumps in your chocolate frosting.
Add heavy cream and vanilla extract. Whip on high for 2 minutes until the frosting is glossy and smooth.
Phase 4: Assembling the Masterpiece
- Place one cake layer on a plate. Spread a thick layer of frosting on top. Repeat with the second and third layers. Frost the top and sides of the Classic Birthday Layer Cake. Chill for 2 hours for structural stability before serving.
Chef's Note: If your cake layers have rounded tops, use a serrated knife to slice off the "dome." This makes the Classic Birthday Layer Cake stack straight and prevents it from leaning.
Fixing Common Cake Fails
Getting a cake to stand tall and taste velvety takes a bit of patience. Most mistakes happen during the mixing or the cooling phase. If your cake feels too dense, you likely overmixed the batter once the flour went in.
Troubleshooting Common Issues
| Issue | Solution |
|---|---|
| Why Your Cake Sank | A sunken center usually means the oven door was opened too early or the baking powder is expired. When you let cold air in, the structure collapses before it sets. |
| Why Your Batter Curdled | If the batter looks grainy or split, your eggs or milk were too cold. The cold liquid causes the butter to seize up. |
| Why Your Cake Is Sliding | A sliding cake is usually the result of frosting a cake that wasn't fully cool or using frosting that is too soft. Chilling the cake for 2 hours is the most important step for a stable result. |
Common Mistakes Checklist
- ✓ Sifted the cake flour to remove lumps
- ✓ Butter was truly softened, not melted
- ✓ Eggs were at room temperature
- ✓ Pans were lined with parchment paper
- ✓ Cake cooled completely before frosting
Adjusting Your Batch Size
If you're making a smaller celebration, you can easily scale this Classic Birthday Layer Cake down. For a half batch, use 1.5 inch pans or just make two smaller layers. When using half an egg, crack it into a bowl, beat it, and measure out 2 tablespoons.
Reduce the bake time by about 20%, but still rely on the toothpick test.
For a double batch, don't just double the baking powder and salt. Increase them to about 1.5x the original amount to avoid a soapy taste. Work in batches if your mixer is small. If you're baking more layers at once, lower the oven temp to 325°F (160°C) and extend the bake time by 5-10 minutes.
This ensures the heat distributes evenly across the oven.
| If you want... | Do this... |
|---|---|
| A taller cake | Add a 4th layer and increase frosting by 50% |
| A lighter flavor | Swap cocoa powder for 1/2 cup melted white chocolate |
| A denser crumb | Use all purpose flour instead of cake flour |
Debunking Cake Myths
You'll hear a lot of advice about cakes, but some of it is just noise. For instance, some people say you must "cream" butter and sugar for 10 minutes. Truth is, after 5 minutes, you've hit the point of diminishing returns.
Any more and you risk the butter getting too warm and collapsing.
Another big myth is that greasing the pan with butter is enough. While it helps, the sides of the pan can still grip the cake. Parchment paper is the only way to be 100% sure your Classic Birthday Layer Cake comes out in one piece.
Finally,, some claim that room temperature ingredients are optional. They aren't. Cold eggs will break your emulsion, leading to a coarse texture. It's worth the 30 minutes of waiting.
Storage and Waste Tips
Keep your Classic Birthday Layer Cake in an airtight container in the fridge for up to 5 days. Because of the butter content, it stays moist. However, the cake can taste a bit hard straight from the fridge. Let a slice sit at room temperature for 30 minutes before eating to let the butter soften.
For long term storage, you can freeze the unfrosted layers. Wrap them tightly in plastic wrap and then foil. They'll stay fresh for 3 months. Just thaw them in the fridge overnight before frosting.
To avoid waste, don't throw away the cake scraps from leveling the tops. Crumble them into a bowl, mix with a bit of the leftover frosting, and roll them into cake pops. It's a great way to use every bit of that decadent sponge. If you're looking for another party treat, try my Classic Red Velvet Cake for a different flavor profile.
The Best Pairing Ideas
Since this is a rich, chocolatey dessert, you want things that cut through the sweetness. A tart raspberry coulis or fresh strawberries on the side work wonders. The acidity of the berries balances the heavy butter and cocoa.
If you're serving this at a party, a strong cold brew coffee or a glass of cold milk is the classic choice. For something more indulgent, a scoop of Ice Cream for 6 recipe on the side turns a slice of cake into a full blown sundae.
If you're in a rush and can't commit to a full layer cake, my Easy Vanilla Layer Cake is a great shortcut for smaller gatherings. But for the big days, the Classic Birthday Layer Cake is the one that always wins.
Recipe FAQs
How do you make a stacked birthday cake?
Assemble the three cake layers by spreading frosting between each and over the exterior. Chill the completed cake for 2 hours to ensure the structure is stable before serving.
Which flavor of cake is most popular for birthdays?
Chocolate is typically the favorite choice. This recipe achieves that classic appeal by combining a fluffy cake base with a glossy cocoa powder frosting.
How can I make a simple birthday cake more special?
Pair the cake with a complementary dessert. Serving your slices alongside birthday ice cream elevates the presentation and flavor profile.
How can I build a square tiny layer cake?
Use a small square baking pan instead of round ones. Divide the batter evenly and bake at 350°F (175°C) until a toothpick inserted into the center comes out clean.
Why did the center of my cake sink?
Stop opening the oven door during the baking process. Introducing cold air too early can cause the cake structure to collapse before it has fully set.
Why does my cake batter look curdled?
Use room temperature eggs and whole milk. If these ingredients are too cold, they will cause the softened butter to seize, resulting in a grainy or split batter.
Is it true that layer cakes cannot be frozen?
No, this is a common misconception. Unfrosted layers can be wrapped tightly in plastic and foil and frozen for up to 3 months; simply thaw them in the fridge overnight.
Classic Birthday Layer Cake