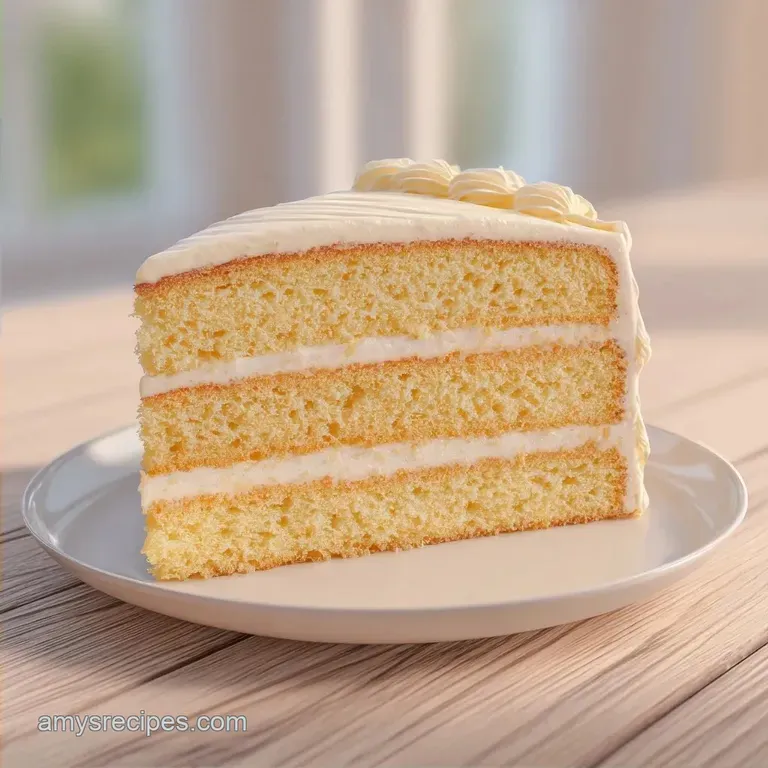
Easy Vanilla Layer Cake: Velvety and Moist
- Time:15 minutes active + 30 minutes baking + 60 minutes cooling/chilling
- Flavor/Texture Hook: Velvety crumb with a rich, buttery finish
- Perfect for: Birthdays, anniversaries, or any "just because" celebration
The smell of vanilla bean and browning butter always takes me back to my grandmother's kitchen, but my own early attempts were a disaster. I remember making a cake for a friend's birthday that looked great on the outside, but the first slice felt like eating a sponge soaked in sugar.
It was either too dry, leaving everyone reaching for their water glasses, or so dense it felt like a brick.
The problem was usually my obsession with only using butter for that "rich" taste. I didn't realize that while butter tastes great, it hardens in the fridge, which is why so many homemade cakes feel stiff the next day.
I spent a lot of time figuring out how to balance that richness with something that keeps the cake soft and springy.
That's where this Easy Vanilla Layer Cake comes in. It uses a hybrid fat method that fixes the dryness problem for good. You get the decadent flavor of butter and the velvety, long lasting moisture of oil. It's the exact version I use now whenever I need a reliable, crowd pleasing dessert that actually tastes homemade.
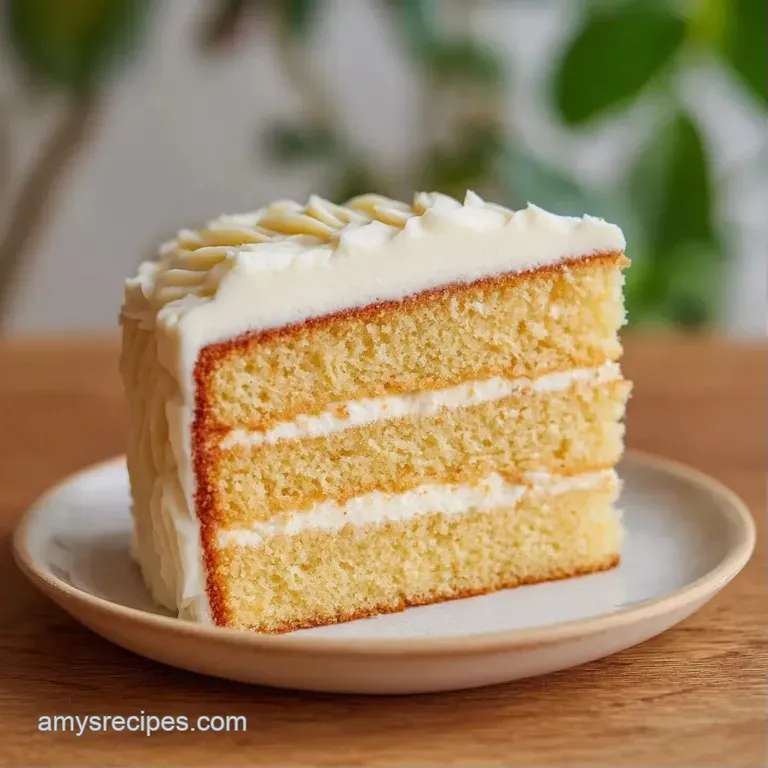
Easy Vanilla Layer Cake
Most people struggle with vanilla cakes because vanilla is a "quiet" flavor. If your technique is off, you just taste flour and sugar. To make this Easy Vanilla Layer Cake work, you need a specific balance of acidity and fat.
The buttermilk is the secret weapon here, as it breaks down the gluten in the flour, making the crumb tender instead of chewy.
I've found that the most common mistake is rushing the cooling process. If you frost a cake that's even slightly warm, your buttercream will slide right off, leaving you with a melted mess. That's why I insist on the freezer trick.
Popping the layers in the freezer for a quick 20 minutes firms up the structure and makes frosting a breeze.
This recipe isn't about fancy tricks, but about doing the simple things right. We aren't using professional grade equipment or rare ingredients. We're just using basic pantry staples to create something that feels special.
Whether you're a beginner or someone who's been baking for years, this version is designed to be foolproof.
Why This Works
Since I'm not a scientist, I just look at what happens in the pan. After a lot of trial and error, here is why these specific steps make the cake so soft.
- Hybrid Fat System
- Butter provides the flavor, while oil stays liquid at room temperature, which keeps the cake moist for days.
- Buttermilk Reaction
- The acid in buttermilk reacts with baking soda to create tiny air bubbles, making the cake fluffy.
- Cold Crumb Technique
- Chilling the layers before frosting prevents crumbs from getting mixed into your icing.
- Sifted Sugar
- Sifting the powdered sugar removes lumps, ensuring the frosting is silky and smooth.
- Room Temp Ingredients
- Eggs and buttermilk at room temperature emulsify better, trapping more air in the batter.
Since you might be wondering if this is overkill compared to a box mix, I put together this quick look at the differences.
| Feature | Box Mix | Easy Vanilla Layer Cake | Impact |
|---|---|---|---|
| Texture | Spongy/Uniform | Velvety/Tender | Better mouthfeel |
| Flavor | Artificial Vanilla | Rich, Natural Vanilla | More sophisticated taste |
| Moisture | Short lived | Long lasting | Stays fresh longer |
| Effort | Very Low | Low to Medium | Higher quality result |
It's a small jump in effort for a massive jump in taste.
Component Analysis
Not every ingredient is just for flavor. Some are there to do the heavy lifting in terms of structure and texture.
| Ingredient | Science Role | Pro Secret |
|---|---|---|
| Buttermilk | Tenderizer | Adds a slight tang that cuts through the sugar |
| Vegetable Oil | Moisture Lock | Keeps the cake from drying out in the fridge |
| Baking Soda | Lift | Works with buttermilk to create a high rise |
| Powdered Sugar | Structure | Provides the stability needed for the frosting layers |
The Building Blocks
Here is everything you need. I recommend getting your eggs and buttermilk out of the fridge about an hour before you start.
For the Cake Batter
- 2.5 cups all purpose flourWhy this? Provides the standard structure needed for layering
- 1.5 cups granulated sugarWhy this? Adds sweetness and helps with browning
- 2.5 tsp baking powder
- 0.5 tsp baking sodaWhy this? Reacts with buttermilk for extra lift
- 0.5 tsp salt
- 3 large eggs (room temperature)
- 0.5 cup unsalted butter, softenedWhy this? Essential for that classic bakery flavor
- 0.5 cup vegetable oilWhy this? Ensures a moist, velvety crumb
- 1 cup buttermilkWhy this? Tenderizes the flour for a softer bite
- 1 tbsp pure vanilla extractWhy this? high quality extract makes the flavor pop
For the Vanilla Buttercream
- 1.5 cups unsalted butter, softened
- 5 cups powdered sugar, sifted
- 3 tbsp heavy creamWhy this? Adjusts the consistency of the frosting
- 2 tsp pure vanilla extract
- 1 pinch salt
Ingredient Swaps
| Original Ingredient | Substitute | Why It Works |
|---|---|---|
| Buttermilk | Whole milk + 1 tbsp lemon juice | Mimics acidity. Note: Let it sit 5 mins first |
| Vegetable Oil | Melted coconut oil | Similar fat content. Note: Adds a slight coconut scent |
| All Purpose Flour | Cake Flour | Lower protein. Note: Results in an even softer, finer crumb |
| Heavy Cream | Whole milk | Similar liquid. Note: Frosting will be slightly less stable |
If you don't have buttermilk on hand, you can either use whole milk, or make your own! here is a great tutorial showing how: https://www.thekitchn.com/how-to-make-a-quick easy-buttermilk substitute-cooking lessons-from the-kitchn-185757
Essential Tools
You don't need a professional kitchen, but a few specific tools make this Easy Vanilla Layer Cake much easier to assemble.
- Two 8 inch round cake pans: These are the standard for a double layer cake.
- Parchment paper: This is non negotiable. Grease the pan, but the paper ensures the cake actually comes out.
- Hand mixer or stand mixer: You need enough power to beat the batter for 2 minutes to get it pale.
- Wire cooling rack: Prevents the bottom of the cake from getting soggy from steam.
- Offset spatula: Makes smoothing the frosting much easier than using a knife.
- Toothpicks: For checking doneness without cutting into the cake.
How to Make It
Let's get into it. Take your time with the mixing, as that's where the texture is decided.
Phase 1: Prepping for Success
Preheat your oven to 350°F (175°C). Grease two 8 inch cake pans with butter or spray. Cut circles of parchment paper to fit the bottom of each pan and press them in. Note: This prevents the "stuck to the bottom" tragedy.
Phase 2: Mixing the Batter
Whisk the flour, sugar, baking powder, baking soda, and salt in a large bowl. Make sure there are no huge clumps of baking soda.
Add the softened butter, oil, eggs, buttermilk, and vanilla extract to the dry ingredients. Beat on medium speed with a hand mixer for about 2 minutes until the batter is smooth and pale. Note: Don't overbeat after this, or the cake will become tough.
Phase 3: The Bake
Divide the batter evenly between the two prepared pans. Use a spatula to smooth the tops.
Bake for 28–32 minutes until a toothpick inserted into the center comes out clean. The edges should be just starting to pull away from the sides of the pan.
Phase 4: Cooling and Assembly
Let the cakes cool in the pans for 10 minutes. Then, carefully run a knife around the edge and transfer them to a wire rack to cool completely.
Place the cooled layers in the freezer for 20 minutes. Note: This firms up the crumb so you don't get cake bits in your frosting.
Prepare the buttercream by beating together softened butter, powdered sugar, heavy cream, vanilla extract, and salt. Beat on high until the frosting is fluffy and pale.
Frost the first layer, stack the second on top, and cover the whole thing.
Chef's Tip: To get those perfectly smooth sides, do a "crumb coat." Apply a very thin layer of frosting over the whole cake and refrigerate it for 15 minutes. This seals in the crumbs, so your final layer of frosting looks professional and clean.
Troubleshooting Guide
Even with a simple recipe, things can go sideways. Most cake issues come down to temperature or measurement.
| Issue | Solution |
|---|---|
| Why Your Cake Sank in the Middle | This usually happens if the oven door is opened too early or if the baking powder is old. When you open the oven, the temperature drops, and the air bubbles collapse before the structure is set. |
| Why the Texture is Too Dense | Overmixing is the most likely culprit. Once you add the wet ingredients, you only want to beat it until it's smooth. |
| Why Your Frosting is Grainy | This happens when the powdered sugar isn't sifted or the butter wasn't soft enough. |
Common Mistakes Checklist
- ✓ Did you use room temperature eggs and buttermilk?
- ✓ Did you line the pans with parchment paper?
- ✓ Did you sift the powdered sugar for the buttercream?
- ✓ Did you wait for the cake to be completely cold before frosting?
- ✓ Did you avoid opening the oven door during the first 20 minutes?
Adjustment Guidelines
You don't always need a full 16 slice cake. Here is how to change the size without ruining the chemistry.
Scaling Down (Half Batch) To make a single layer or two small 6 inch cakes, halve all ingredients. For the eggs, crack one into a bowl, beat it, and use half of it by weight or volume.
Use a 6 inch pan and reduce the baking time by about 20%, starting to check for doneness at 20 minutes.
Scaling Up (Double Batch) If you're making a massive 3 layer cake, double the batter but be careful with the leavening. I only increase the salt and baking powder by 1.5x rather than 2x to avoid a metallic taste or the cake rising too fast and collapsing.
Work in batches if your mixer is small to ensure everything is incorporated.
Baking Temp for Larger Batches If you're baking more than two pans at once, lower the oven temperature to 325°F (160°C) and extend the bake time by 5-10 minutes.
This ensures the cakes bake evenly and don't brown too quickly on the outside while staying raw in the middle.
Cake Baking Truths
There are a few things people always say about baking that just aren't true. Let's clear those up.
Myth: Searing the cake edges prevents sticking. Some people think "searing" the pan with high heat helps. It doesn't. The only thing that reliably prevents sticking is a combination of grease and parchment paper.
Myth: More sugar makes a cake moister. Actually, too much sugar can interfere with the structure, causing the cake to collapse. Moisture comes from the fats (oil and butter) and the acidity of the buttermilk, not the sugar.
Myth: You must use a stand mixer for a layer cake. Not true. A hand mixer works perfectly fine for this Easy Vanilla Layer Cake. The key is the 2 minute beating time, not the brand of the mixer.
Storage Guidelines
You want to keep that velvety texture as long as possible.
Fridge Storage Store the frosted cake in an airtight cake carrier or a large plastic container. It stays fresh for about 4-5 days. Because of the oil in the recipe, it won't get as hard as a butter only cake.
Just let a slice sit at room temperature for 15 minutes before eating for the best texture.
Freezer Storage You can freeze the unfrosted layers! Wrap them tightly in plastic wrap and then a layer of aluminum foil. They stay great for up to 3 months. To thaw, leave them in the wrap at room temperature for 2 hours.
Zero Waste Tips If you have a "dome" on top of your cake, don't throw it away. Slice the tops off to make the layers flat, and crumble the scraps into a bowl. Mix them with a bit of frosting and sprinkles to make cake pops.
Alternatively, these crumbs are amazing sprinkled over a bowl of fresh berries and whipped cream.
How to Serve and Enjoy
A vanilla cake is a blank canvas, so the presentation is where you can really have some fun. Since the cake and frosting are white, I love using a "color balance" strategy to make it look vibrant.
- 1. Deep Red
- Fresh raspberries or sliced strawberries on top add a pop of color and a tart contrast to the sweet vanilla.
- 2. Bright Green
- A few sprigs of fresh mint scattered around the berries make the cake look fresh and professional.
- 3. Golden Yellow
- A light dusting of lemon zest over the frosting adds a subtle citrus aroma and a beautiful visual highlight.
Serving Suggestions For a truly decadent experience, serve a slice of this Easy Vanilla Layer Cake with a scoop of birthday cake ice cream. The cold, creamy ice cream against the soft, room temperature cake is a winning combo.
If you're looking for other flavor profiles to try, you might enjoy a peanut butter frosting cake for something a bit more salty and rich. But for a classic celebration, nothing beats the simple, clean taste of vanilla.
Final Assembly Tip When slicing, dip your knife in hot water and wipe it clean between every single cut. This gives you those clean, sharp edges you see in magazines and prevents the frosting from dragging down the sides of the cake. Enjoy your homemade masterpiece!
Recipe FAQs
What's the secret to a moist layer cake?
Using a combination of butter and oil. The butter provides flavor while the oil ensures the cake stays tender. If you enjoyed the fat ratio here, see how it creates a similar crumb in our easy red velvet.
How to make a quick and easy vanilla cake?
Whisk dry ingredients first, then beat in wet ingredients for 2 minutes. Bake at 350°F for 28 32 minutes until a toothpick inserted into the center comes out clean.
How do you make a stacked birthday cake?
Freeze cooled layers for 20 minutes before frosting. This firms up the crumb, making it easier to stack and frost without the cake shifting.
How can we build a square tiny layer cake?
Bake the batter in a square pan and trim the edges with a serrated knife. Stack the squared layers with buttercream in between and frost the exterior.
How can you make a simple birthday cake more special?
Use a piping bag to add decorative swirls of buttercream. Sifting the powdered sugar ensures the frosting is silky smooth for a professional finish.
Why did my cake sink in the middle?
This happens when the oven door is opened too early. The sudden drop in temperature causes air bubbles to collapse before the structure sets.
How to store the cake to keep it fresh?
Place the frosted cake in an airtight container in the fridge. It stays fresh for 4-5 days; let slices sit at room temperature for 15 minutes before eating for the best texture.
Easy Vanilla Layer Cake

