Easy Red Velvet Layer Cake: Velvety and Moist
- Time: 20 min active + 2 hours 30 mins baking and chilling
- Flavor/Texture Hook: Velvety, tight crumb with a tangy, silky finish
- Perfect for: Birthdays, anniversaries, or when you want to feel fancy without the stress
Easy Red Velvet Layer Cake
The smell of cocoa and vinegar is a strange combination until it hits the oven. Then, it turns into that warm, comforting aroma that reminds me of old Southern kitchens. Growing up, red velvet wasn't just a color, it was a tradition.
It represented a specific kind of hospitality, the kind where you'd find a slice of deep red cake on a floral plate every single Sunday afternoon.
For a long time, people thought red velvet was just chocolate cake with food coloring. But if you look at the history, it was actually the reaction between non alkalized cocoa and acidic buttermilk that created a natural mahogany hue.
Over time, as cocoa changed, we started adding the red dye to bring back that iconic, bold look.
This Easy Red Velvet Layer Cake is my way of keeping that tradition alive while making it foolproof for a modern kitchen. You can expect a cake that is soft, a bit tangy, and looks like it came from a high end bakery, even if you've never made a layer cake before.
Why This Cake Hits Home
I love this recipe because it doesn't rely on fancy tricks. It uses basic pantry staples to create something that feels decadent. The contrast between the rich, red sponge and the stark white frosting is a classic for a reason, it just looks right on a table.
Whether you're making this for a birthday or just because it's Tuesday, the result is always consistent. It's the kind of dessert that makes people ask for the recipe before they've even finished their first slice.
What Actually Makes It Velvet
Acid Base Reaction: The combination of buttermilk, vinegar, and baking soda creates tiny bubbles that lift the cake. This prevents the crumb from becoming too dense.
Oil Based Moisture: Using vegetable oil instead of butter in the cake ensures it stays moist even when refrigerated. Butter cakes can harden in the fridge, but oil keeps the texture silky.
Cocoa Balance: The small amount of cocoa provides a hint of chocolate flavor without overpowering the tang of the buttermilk. This balance is what defines a true red velvet.
Frosting Stability: Full fat cream cheese and butter create a structure that holds its shape but melts in your mouth.
| Method | Time | Texture | Best For |
|---|---|---|---|
| From Scratch | 2 hours 50 mins | Velvety & Tender | Special Occasions |
| Box Mix Shortcut | 1 hour | Spongy & Sweet | Quick Cravings |
| Single Layer | 1 hour 15 mins | Dense & Moist | Small Gatherings |
The Main Ingredient Roles
Understanding what each part does helps you avoid mistakes. If you know why the buttermilk is there, you won't be tempted to swap it for regular milk.
Component Analysis
| Ingredient | Science Role | Pro Secret |
|---|---|---|
| Buttermilk | Tenderizes gluten | Use room temperature to avoid curdling |
| Baking Soda | Reacts with acid | Sift with flour to avoid bitter clumps |
| Vinegar | Boosts the "lift" | Adds that signature tangy red velvet bite |
| Cream Cheese | Provides structure | Soften to room temp for a silky finish |
Selection Guide
- All Purpose Flour (315g): Provides the structure. Why this? Balanced protein for a sturdy but soft cake.
- Granulated Sugar (300g): Adds sweetness and moisture. Why this? Dissolves easily into the wet ingredients.
- Baking Soda (5g): The primary leavening agent. Why this? Reacts instantly with the acid.
- Salt (2g): Balances the sugar. Why this? Enhances the cocoa flavor.
- Unsweetened Cocoa Powder (15g): The flavor base. Why this? Just enough to be "velvet" not "chocolate".
- Buttermilk (240ml): The secret to tenderness. Why this? Acid breaks down gluten proteins.
- Large Eggs (2): Binds everything together. Why this? Adds richness and stability.
- Vegetable Oil (350ml): For a moist crumb. Why this? Doesn't solidify in the fridge.
- White Distilled Vinegar (5ml): Extra lift. Why this? Works with baking soda for height.
- Vanilla Extract (5ml): Aroma. Why this? Rounds out the sharp acid notes.
- Red Food Coloring (15ml): For the look. Why this? Gives that classic bold red color.
- Full Fat Cream Cheese (450g): Frosting base. Why this? Provides the necessary tang.
- Unsalted Butter (115g): Frosting richness. Why this? Creates a smooth, spreadable texture.
- Powdered Sugar (500g): Sweetener and thickener. Why this? Sifts into a velvety finish.
| Original Ingredient | Substitute | Why It Works |
|---|---|---|
| Buttermilk (1 cup) | 1 cup milk + 1 tbsp lemon juice | Mimics acidity. Note: Slightly less creamy |
| Vegetable Oil (1.5 cups) | Melted Coconut Oil | Similar fat content. Note: Adds a faint coconut scent |
| Red Food Coloring | Beet powder | Natural pigment. Note: Color is more earthy/brown |
Gear For The Job
You don't need a professional kitchen, but a few tools make this much easier. I usually use a stand mixer such as KitchenAid, but a hand mixer works just fine too.
- Two 8 inch Round Cake Pans: The standard for a layer cake.
- Parchment Paper: Non negotiable for a clean release.
- Large Mixing Bowls: One for wet, one for dry.
- Whisk and Spatula: For mixing and scraping the sides.
- Wire Cooling Rack: To prevent soggy bottoms.
- Electric Mixer: Essential for getting the frosting silky.
Step by step Baking

Right then, let's get into the actual process. Follow these steps closely, especially the part about not overmixing.
Phase 1: Prepping for Success
- Preheat your oven to 350°F (175°C). Grease two 8 inch round cake pans with butter and line the bottoms with parchment paper. Note: Parchment is the only way to ensure the cake doesn't stick.
Phase 2: Mixing the Batter
- Whisk together the flour, sugar, baking soda, salt, and cocoa powder in a large bowl until no lumps remain. Note: Sifting the cocoa powder is a good idea if it looks chunky.
- In a separate bowl, beat the vegetable oil, buttermilk, eggs, red food coloring, vinegar, and vanilla until the mixture is smooth. Note: Ensure eggs are room temperature so they emulsify properly.
- Gradually stir the wet ingredients into the dry ingredients until just combined. Stop stirring the moment you don't see any more flour streaks.Note: Overmixing creates a tough cake.
Phase 3: Baking to Perfection
- Divide the batter evenly between the two pans. Bake for 30-35 minutes until a toothpick inserted into the center comes out clean.
- Allow the cakes to cool in the pans for 10 minutes, then transfer them to a wire rack to cool completely. Note: Never frost a warm cake or the frosting will melt into a puddle.
Phase 4: Frosting and Assembly
- Beat the softened cream cheese and butter together until smooth. Gradually add the powdered sugar, vanilla, and salt, beating until the frosting is silky.
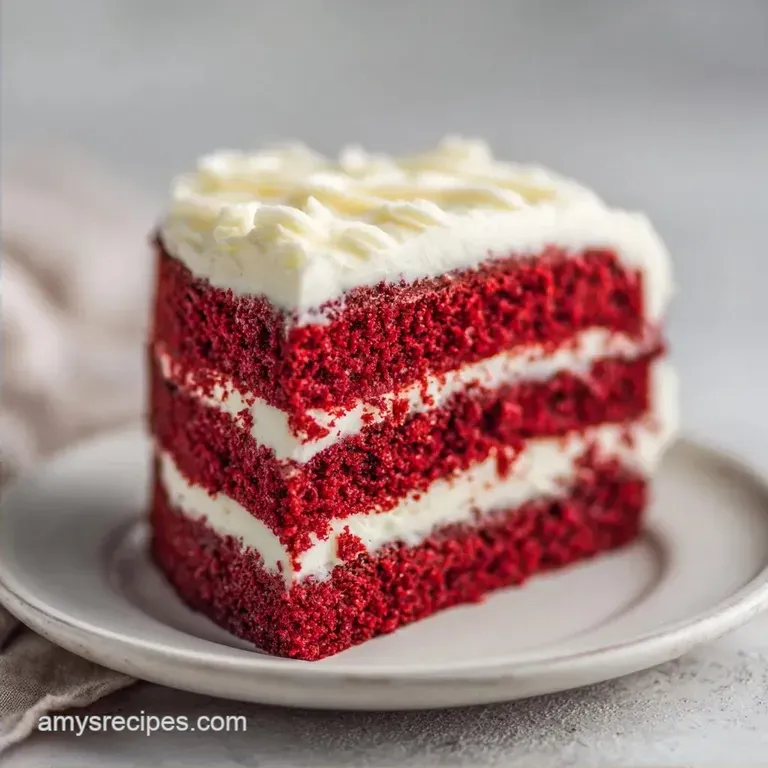
- Place one layer on a plate, spread a thick layer of frosting, and top with the second cake layer. Frost the top and sides.
- Chill the cake in the fridge for 2 hours until the frosting feels set and firm.
Chef's Note: If you want a professional look, do a "crumb coat". Apply a very thin layer of frosting over the whole cake and chill it for 15 minutes. This locks in the crumbs so your final layer of frosting is perfectly smooth.
Fixing Common Baking Glitches
Even the best of us have cakes that sink or frosting that slides. Most of the time, it's a simple temperature issue.
Troubleshooting Common Issues
| Issue | Solution |
|---|---|
| Why Your Cake Sinks | If the middle of your cake dips, you likely opened the oven door too early. The rush of cold air can collapse the air bubbles before the structure has set. Keep the door shut until the 30 minute mark. |
| Why Your Frosting Is Runny | This usually happens if the butter or cream cheese was too warm, or if you over beat the frosting. Over mixing can introduce too much air and break the emulsion. Stop mixing as soon as it's smooth. |
| Why Your Layers Cracked | Cracks on top often come from over baking or too much baking soda. Check your measurements with a scale for better accuracy. If they do crack, just level them off with a serrated knife. |
Common Mistakes Checklist
- ✓ Eggs and buttermilk are actually room temperature
- ✓ Oven was fully preheated before the cake went in
- ✓ Cake layers cooled completely before frosting
- ✓ Powdered sugar was sifted to remove lumps
- ✓ Pans were lined with parchment paper
Twists on the Classic
One of the best things about this Easy Red Velvet Layer Cake is how versatile it is. You can change the size, the color, or even the dietary needs.
Changing the Size
If you don't have 8 inch pans, you can make an easy single layer red velvet cake in a 9x13 rectangular pan. Just bake it for about 25-30 minutes. For those who want a more impressive look, you can easily turn this into a three layer red velvet cake by increasing the batter by 50% and using three 6 inch pans.
Adjusting the Texture
If you're looking for a light red velvet cake recipe, you can replace half of the vegetable oil with unsweetened applesauce. It reduces the fat and creates a slightly airier sponge. For a more traditional feel, you can try a Red Velvet Birthday Cake recipe which often uses different fat ratios for a richer taste.
Natural Color Options
I completely understand if you don’t want to use red food coloring. So I wanted to give you some options if you still wa... you can find five alternatives to red food coloring from The Kitchn to get a more natural look.
Decision Shortcut:
- If you want a taller cake → Use three 6 inch pans
- If you want a faster prep → Bake as a single sheet cake
- If you want a lighter taste → Use applesauce as a partial oil swap
Preservation Secrets
Red velvet stays fresh longer than most cakes because of the oil and the acidity of the frosting, but you still need to store it right.
Fridge Storage: Keep the cake in an airtight container in the fridge for up to 5 days. The cream cheese frosting must stay cold for safety.
Freezing Tips: You can freeze the cake layers without frosting for up to 3 months. Wrap them tightly in plastic wrap and then foil. Thaw them in the fridge overnight before frosting.
Zero Waste: Don't throw away the cake scraps from leveling the tops! I love to crumble these scraps into a bowl and mix them with a bit of extra frosting to make cake pops. If you have leftovers that are getting a bit dry, try serving a slice alongside some Birthday Cake Ice Cream to add moisture back in.
Presentation Tips
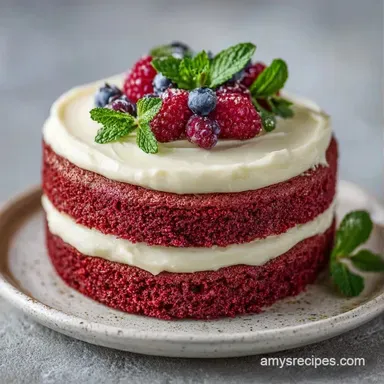
Since this is a bold cake, the garnish strategy should be simple. You want to balance the deep red and the bright white without making it look like a circus.
The Color Balance Strategy
- 1. Deep Red
- Use reserved cake crumbs. Pulse a few pieces of the cake in a blender and sprinkle them on top for a textured, monochromatic look.
- 2. Bright White
- Keep the frosting clean. Avoid adding other colors to the frosting; let the white pop against the red layers.
- 3. Vibrant Green
- Add a few fresh mint leaves or a single raspberry on top. The green or bright berry red adds a fresh element to the rich dessert.
Final Touches
When slicing, use a hot knife. Dip your knife in hot water and wipe it dry between every single cut. This prevents the frosting from dragging across the red sponge, giving you those clean, sharp lines you see in magazines.
Right then, that's how you nail an Easy Red Velvet Layer Cake. It's a decadent treat that feels like a celebration every time it hits the table. Just remember to be patient with the cooling process, and your cake will come out velvety every single time. Enjoy!
Recipe FAQs
What to layer red velvet cake with?
Cream cheese frosting. The tanginess of the frosting perfectly balances the cocoa and sweetness. If you enjoy bold flavor combinations, you might also like our peanut butter cake.
How to make a simple red velvet cake?
Whisk dry ingredients and stir in the wet mixture until just combined. Bake the batter in two 8 inch round pans at 350°F for 30-35 minutes.
What are common red velvet mistakes?
Overmixing the batter or opening the oven too early. Opening the door before 30 minutes can let in cold air, causing the center to sink.
What is the secret to moist red velvet cake?
Using vegetable oil and room temperature buttermilk. Oil provides a more consistent moisture than butter, while the acidity in buttermilk tenderizes the crumb.
How to make a fluffy red velvet cake?
Sift the powdered sugar and avoid overworking the batter. This prevents lumps in the frosting and keeps the cake layers from becoming dense.
Is red velvet cake just chocolate cake with red dye?
No, this is a common misconception. The specific chemical reaction between buttermilk, vinegar, and baking soda creates a unique velvety texture different from standard chocolate cake.
How to prevent the frosting from becoming runny?
Use softened butter and cream cheese. Stop mixing as soon as the frosting is smooth to avoid breaking the emulsion.
Easy Red Velvet Layer Cake